- 老高與小茉
- https://www.youtube.com/@laogao
- 有趣的知識分享
- MoneyXYZ
- https://www.youtube.com/@MoneyXYZ
- 财务自由和个人成长
- 王剑每日观察
- https://www.youtube.com/@wongkim728
- 要闻简报,时事评论
- 百靈果News
- https://www.youtube.com/@bailingguo
- 談新聞八卦,嘉賓談話類,了解華人與海外中文圈
- yagai_no_moriko
- https://www.youtube.com/@yagai_no_moriko
- solo car camping,不說話只拍攝的旅遊博主
- 劉偉元的旅行
- https://www.youtube.com/@liuweiyuan
- 單人單車旅游博主
- to be continued…
Author: Glori
-
YouTube频道推荐列表
-
TDM车间控制 培训手册 笔记

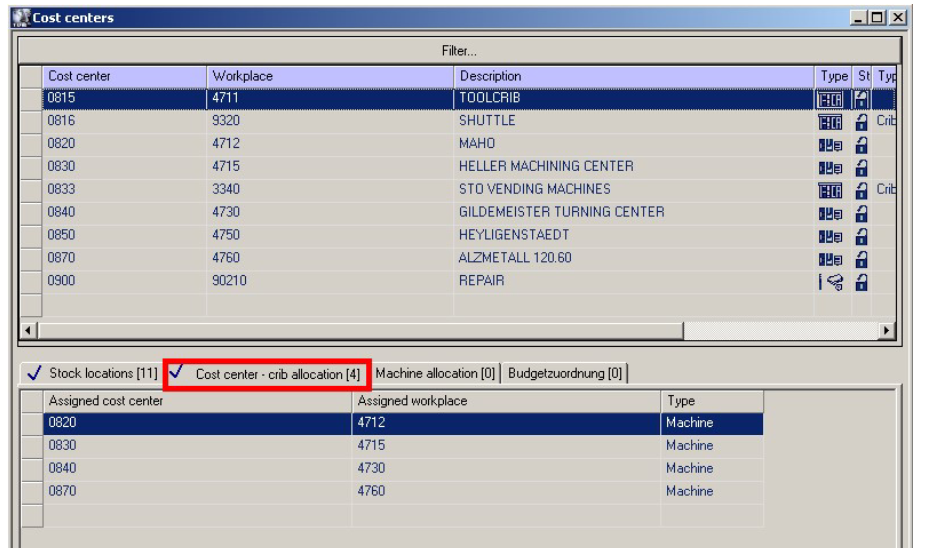
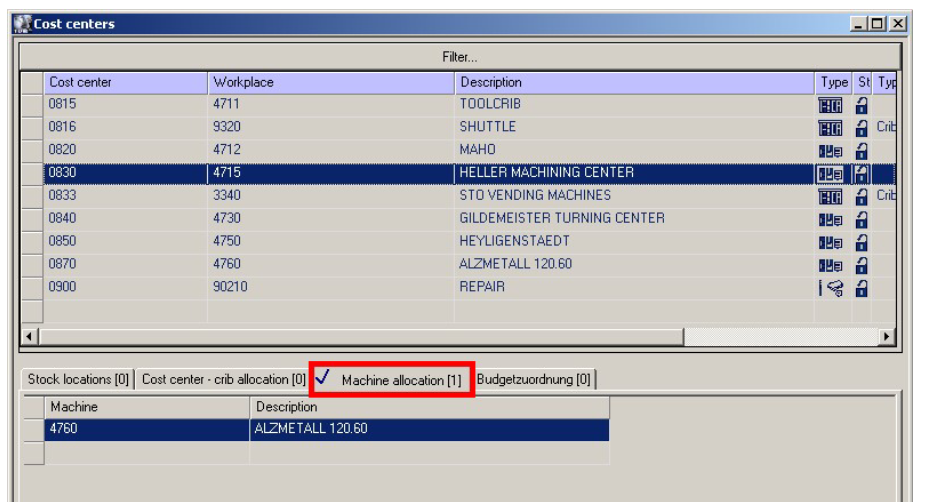
Shopcontrol功能本质是对刀单比对“差别表”功能的扩展,以最优化管理刀具交换(刀具上下机床)
前提条件(配置)
- 准备好完整的刀具刀单数据
- 准备好库房,机床(车间)成本中心
- 机床成本中心和库房成本中心有分配关系
- 机床和机床成本中心有分配关系
- CIR-4 参数设定是否和库房模块联动(初始环境不启用,DEM数据环境已启用,同时打开CIR-11)
- CIR-13~28 参数都是用户定制化参数,其中值得关注的参数
- CIR-21 Machine with external magazine administration – 和Machine – Occupancy 的刀具比对相关
- CIR-23 Machines without presetting
- 其他可能用到的参数
- CIR-30 Partly released in assembly – 允许未全部组装的工单Release
- CIR-31 Default machine – 设置个人的默认机床,方便操作
- CIR-21 Balancing Against the Stock in the Tool Crib Module
- 刀具计算(Balance)时,同时考虑库房模块中已领出在机床成本中心的刀具
- 换句话说默认的刀具计算(Balance)是只计算在本模块内管理的在床刀具
- 先决条件:需要设置
- CIR-4 (Connection to the Tool Crib Module) = Yes
- CIR-11 (Extended Issue) = No
- 刀具计算(Balance)时,同时考虑库房模块中已领出在机床成本中心的刀具
- CIR-34 Use quantity from tool list positions for tool calculation
- 刀具计算(Balance)时如何考虑刀单内的刀具数量,可以设置以下几种情况
- 不考虑数量,有相同的刀每个刀单配1把
- 考虑数量,按刀单内的数量配置总和
- 考虑数量,按刀单内的最大数量配置
- 考虑数量,Greatst sum in a tool list (没看懂)
- 先决条件:需要设置
- CIR-9 (Add Tools Only Once to the Picking Order) = No – 也就是默认是多个刀单计算,只会最多加1把
- 刀具计算(Balance)时如何考虑刀单内的刀具数量,可以设置以下几种情况
CTRL+选取多个生产订单可以多选进行刀具计算,直至满意的装刀清单,可以F6 – Fix tool calculaion
Production Order 流转流程
-
odoo – 公司使用的CRM系统
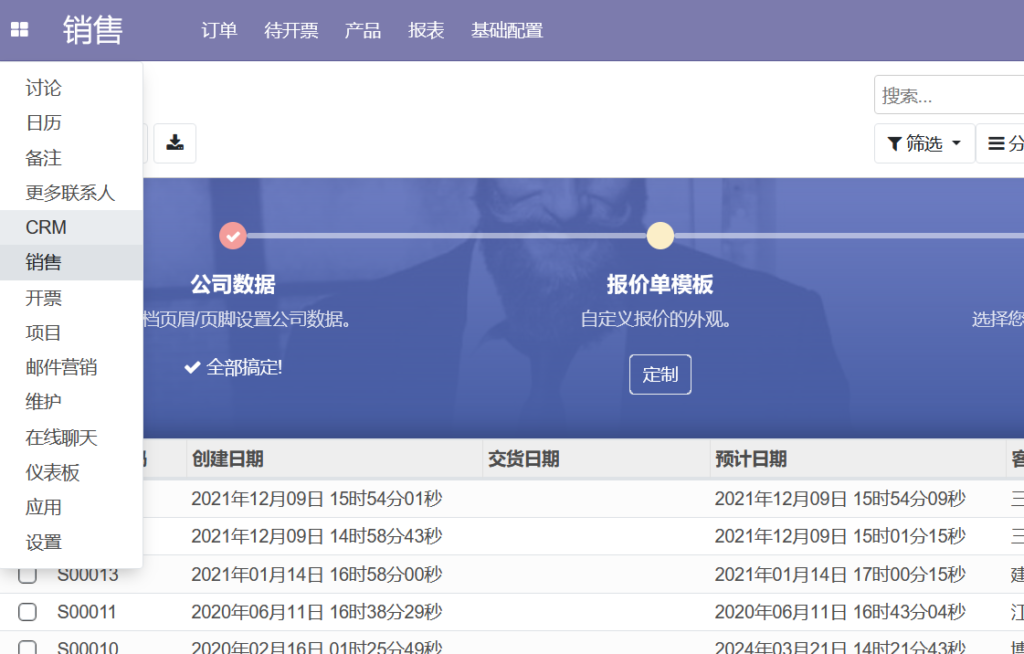
所在公司需要一个简单可用的CRM系统,找了开源+商用可用的odoo用了一段时间。odoo本生是个ERP系统,可以按照不同的业务需求,安装打开不同的模块(App),有些高级功能是收费的。目前公司主要使用的模块是:
- CRM – 售前追踪
- 项目 – 售后和项目实施追踪
- 销售 – 目前主要用来管客户开票
- 联系人 – 管理客户和联系人信息
- 日历 – 协同工具,用来共享工作日历,目前还没有大量使用
- 邮件营销 – 群发邮件,目前也还没使用
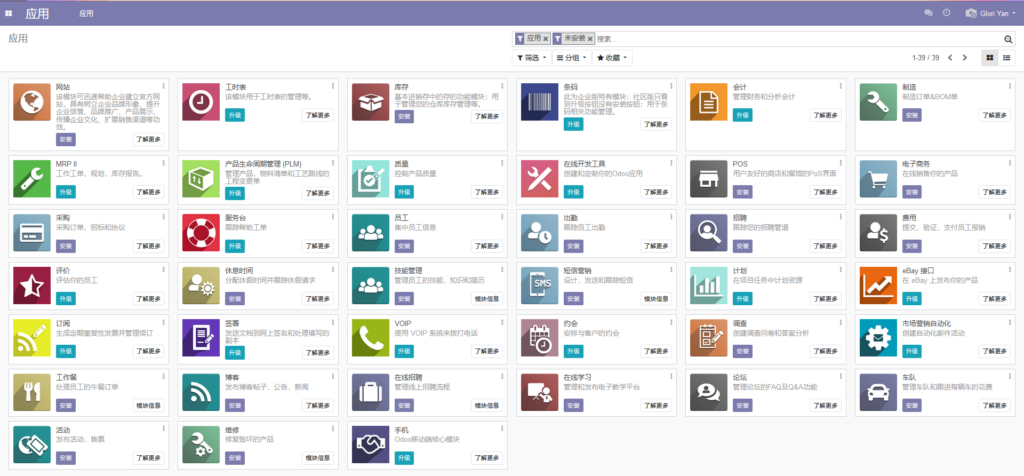
软件免费的模块里就有大量的App。不同公司有不同的刚需,可以按需启用。
目前系统搭建在云端,没有开公网访问,需要使用自己配置的网络隧道进行访问(安装隧道软件,然后双击网络隧道配置文件进行连接,最后使用浏览器访问odoo系统),基本满足简单易用的效果。
-
Proxmox VE 安装
- 基于Proxmox VE 8.0.3
- 硬件配N1000, 16G, 512G SSD + 2 x 10T HDD
- 安装使用U盘启动,硬盘选择 2 x 10T生成 ZFS Raid-1作为系统盘,网络设置1个网口(面板下面那个网口为1号网口,上面为2号)固定IP
- 安装完成第一次重启后,使用https://x.x.x.x:8006訪問web管理界面
- 使用ssh訪問後臺進行源包修改
- putty -ssh root@x.x.x.x
- #vi /etc/apt/sources.list
- + deb http://download.proxmox.com/debian/pve bookworm pve-no-subscription
- #vi /etc/resolve.conf
- nameserver x.x.x.x <change to your LAN’s correct nameserver
- #apt-get -y update
- #apt-get -y dist-upgrade
- 刪除SSD上原有分區
- apt -y install parted
- parted /dev/xxxxx
- rm 4
- rm 3
- …
- quit
- 把SSD作爲zfs log分區
- zpool add rpool log /dev/xxxx
- 初步安裝基本完成
-
TDM基础模块+库存管理模块 – 培训概要
一直覺得培訓需要做的吸引人和有效果,還是要講求方法的。昨晚睡不着時候總結的一套培訓大綱,看下次是否能實踐一下。以下是草稿:
刀具工具的属性或可管理的数据
- 编码
- 类型
- 材质/图层/切割级别
- 使用类别
- 重量
- 机床界面
- 几何参数
- 其他参数
- 图形照片
- CAD图纸
- 装夹接口
- 轮廓图
- 对刀参数
- 附件或配件信息
- 供应商物料信息(采购代码,价格等)
- 加工技术参数与参考信息
- 物理号信息
- 库存与库位信息/采购订单信息
- 代替件信息
- 文件资料
刀具数据完整性 – 级别
基础级别
- 满足检索要求
- 物料采购要求
- BOM要求
- 库房管理要求
需要录入哪些信息?
- TODO: 表格显示哪些信息需要录入完整
- 信息录入后可达到得主要应用场景或功能
- 可行的录入方法(Excel, Webcatalog)
高级级别
- 满足数字化组装要求
- 部件匹配关系要求
- CAM/SIM应用要求
- 工艺技术数据管理要求
-除基础级别需要录入的信息外还需要哪些信息录入?
- TODO: 表格显示需要哪些信息录入(同上,合并顯示)
- 信息录入后可达到的主要应用场景或功能
- 可行的录入方法(T3D)
-
TDM Tips – 如何快快地踢人
TDM的License使用浮動授權,每個用戶打開界面就會占用對應的模塊功能。一般可以通過以下功能來踢人下綫:
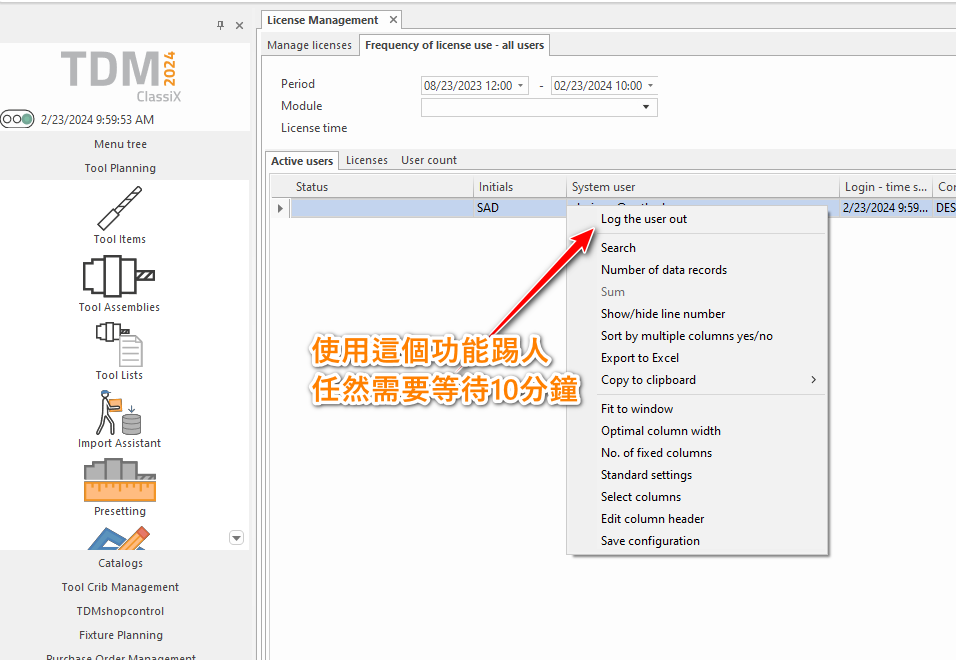
可以通過以下啓動文件tms.ini的參數調整踢人等待時間:
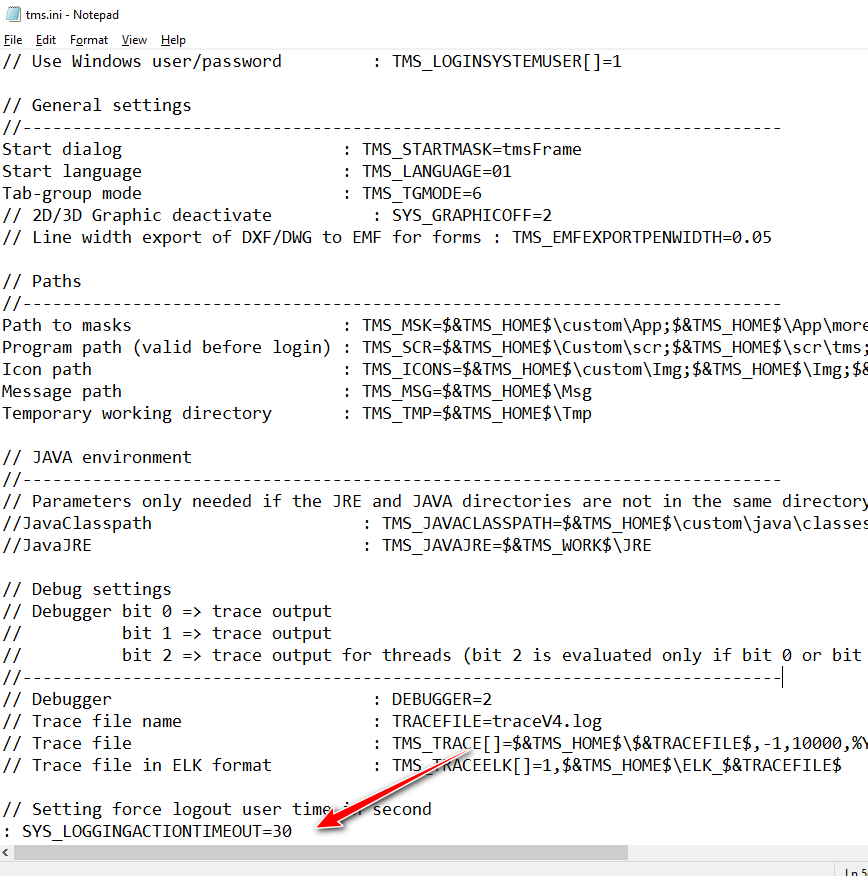
文件位置:[TDM_HOME]\SYS\tms.ini
參數: : SYS_LOGGINGACTIONTIMEOUT=30
注:30為等待秒數
-
TDM – Oracle Tips – TDM连接报错(ORA-15…)

文件位置:[ORACLE_HOME]\network\admin\sqlnet.ora
-
ServerJRE的坑
設想免安裝直接使用JRE的Java跑jar包,試過很多次 java -jar Example.jar都報錯: Unable to run main.App class
就快放棄時候去java.oracle.com下載JDK安裝包時偶然發現還有jre1.8的包,下載後順利可以運行了。ServerJRE這個包肯定有配置,好坑。
JRE1.8 – OK
JDK1.8 – OK
-
iTPK – Kelch凱獅對刀儀接口配置遇阻
按照之前配置成功的筆記進行了配置(kelch.ini),但是啓動後任然一直報錯:
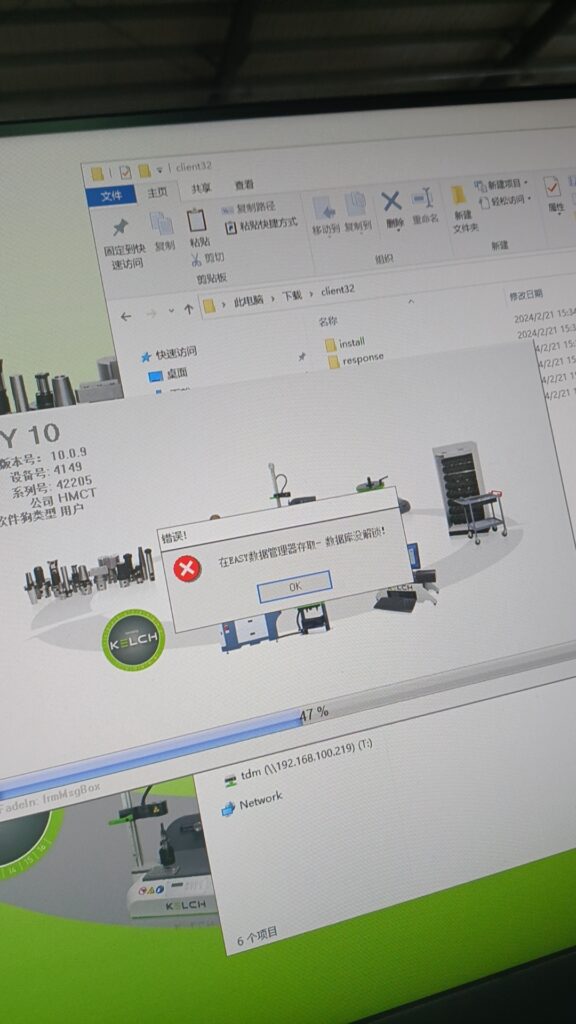
“数据库没解锁” — 從字面一直怀疑是需要解锁或开通某些授权才能使用,但是实际在Kelch工程师指导下,配置OLEDB方式連接Oracle(只保存一套連接設置[REMOTEOLEDBORA]),启动也不报错:
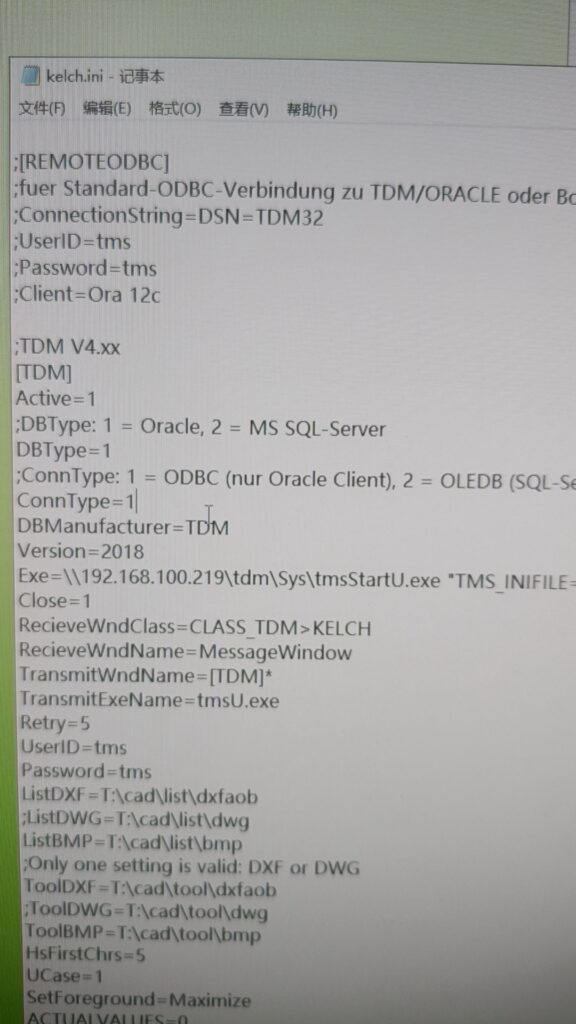
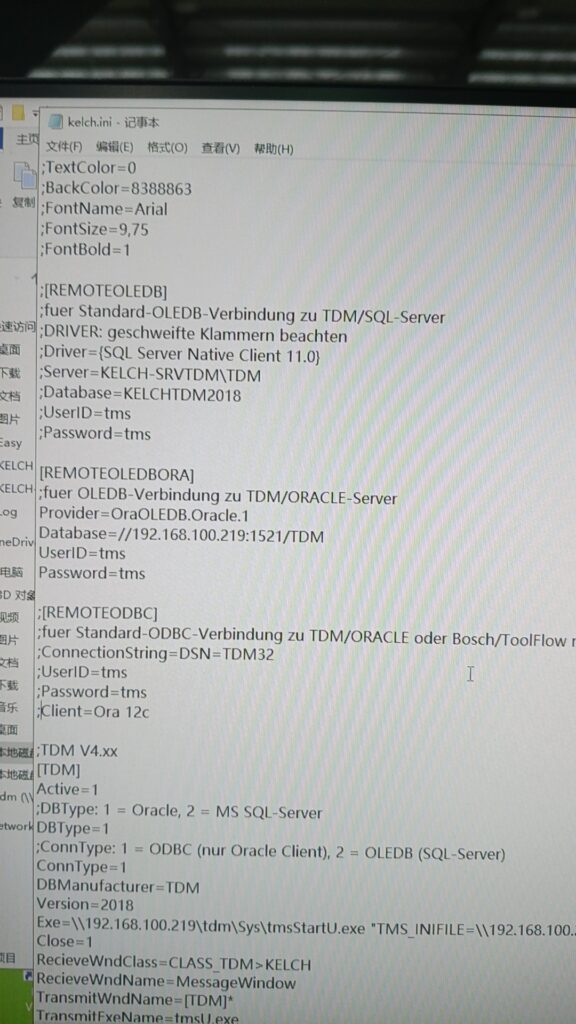
之前這套設置也有試過,但一直是設置ConnType=2(根據注釋的提示–實際是誤導了的)。这里虽然启用的是OLEDB ORA,但实际配置ConnType=1 (ODBC – for Oracle)才能通過–猜想是接口程序默认Oracle始终使用ConnType=1
但这样配置后顺利启动后,任然无法得到TDM的对刀界面:
等待咨询Kelch德国工程师排查问题,未完待续。。。
-
Open Media Vault | 測試筆記
- 安裝OMV時如果沒有可用的網絡,OMV會讓你指定對應的Rounte IP用於聯網。將VirtualBox的網絡設置為NAT后順利繼續安裝。從上圖可知安裝時會抓取或更新安裝的組件包。
- 雖然定位不同,OMV和Proxmox的界面風格完全不同。OMV更傾向於家用,簡潔,直觀,不需要多少文檔,開箱能用。
- 是不是該嘗試下FreeNas(TrueNas)來和OMV比較一下?