Tag: IT

  • Ubuntu Linux – 3 Commands to Disable IPv6

    #sysctl -w net.ipv6.conf.all.disable_ipv6=1
    #sysctl -w net.ipv6.conf.default.disable_ipv6=1
    #sysctl -w net.ipv6.conf.lo.disable_ipv6=1
    //code to check
    #ip a
    ...
    //should be no IPv6 entry now.
  • TDM Oracle Database Tips

    Environment:

    • TDM 2018+
    • Oracle 19c
    • Windows10/11

    Tips:

    • Do NOT change ORACLE_HOME\network\admin\sqlnet.ora
      • Some document was said to change AUTH… to (none). Do NOT change and keep it as (NTS) in Windows10/11, or it might cause some problem during DB creation and startup.
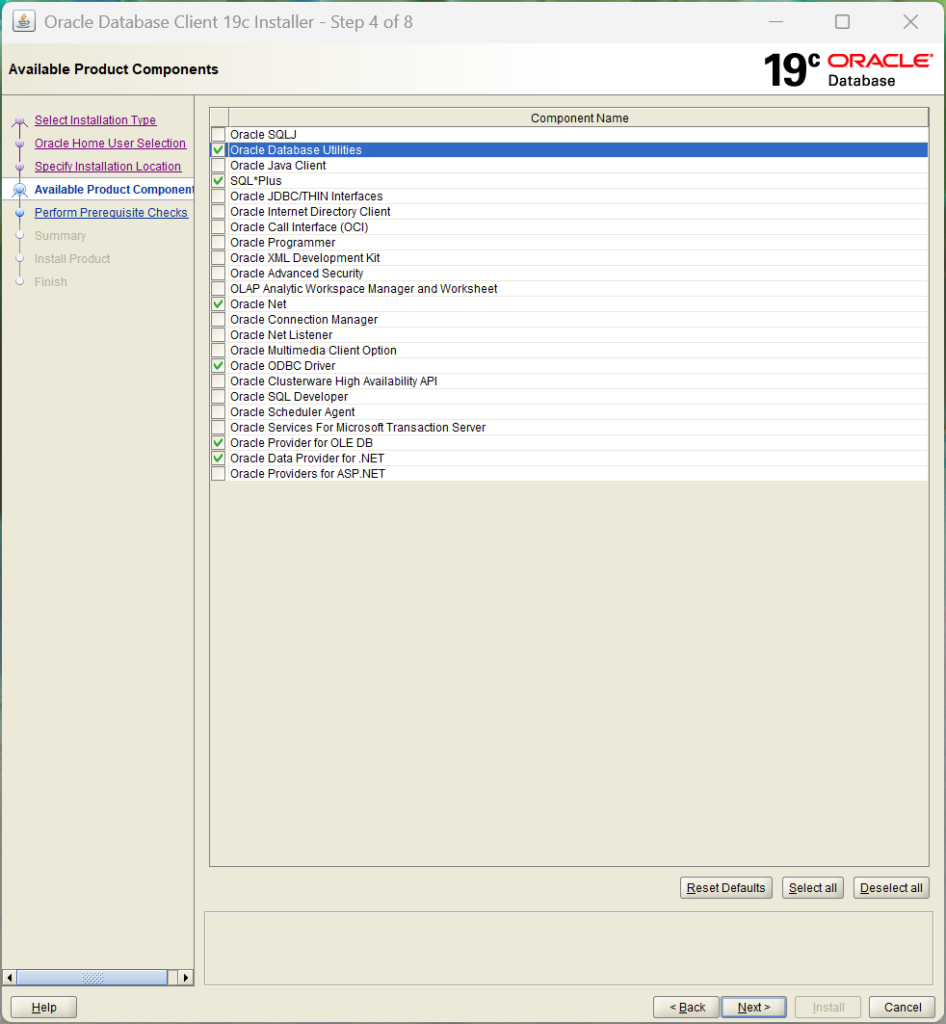
    • Avoid to install both Oracle DB Server and Client in same machine(Standalone)
    • Old TDM version(2018 or early) may still need 32bit Oracle Client. test.udl file can only verify 64bit, NOT 32bit OLE DB component.
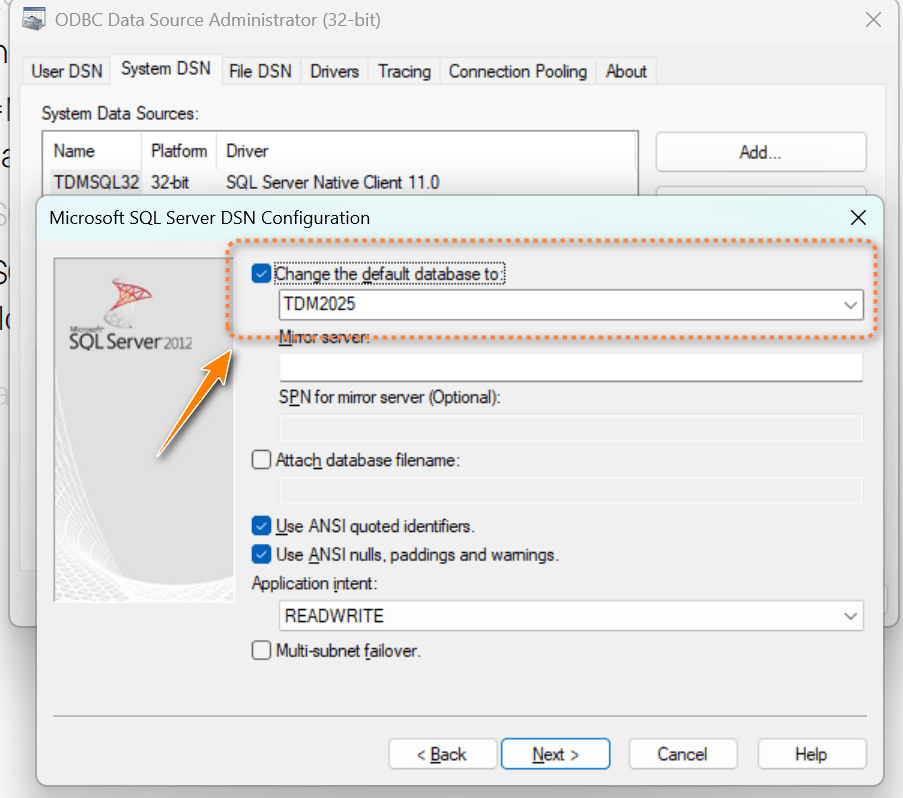
    • Newer TDM version does not need TNSName anymore
    • SQL to check Database character(Unicode/non-Unicode)
    SQLPLUS > select value from nls_database_parameters

  • TDM Installation – Required Oracle(19c) components

    Notes:

    1. Actually OLE DB was the key component.
    2. Early TDM version/TDM Installer may need 32bit Oracle Client.
    3. Both Oracle DB Server and Client was needed for TDM standard alone installation. If there’s problem to recognize the component, please consider on which ORACLE HOME was used (especially command line operation).

  • Win11 启用自动登录

    默认安装的Windows 11没有启用自动登录的选项,以下方法首先修改注册表启用选项,然后使用userpasswords2自动登录界面进行设置。

    Uncheck the box to enable the user with autologon
    1. WIN+R > regedit
    2. WIN+R > control userpasswords2
    Computer\HKEY_LOCAL_MACHINE\SOFTWARE\Microsoft\Windows NT\CurrentVersion\PasswordLess\Device

    Reference: How to Log In Automatically to Windows 11

  • OpenWRT软件包更新日志

    wget -O ipk.pub https://master.dl.sourceforge.net/project/openwrt-passwall-build/ipk.pub
    opkg-key add ipk.pub
    
    read release arch << EOF
    $(. /etc/openwrt_release ; echo ${DISTRIB_RELEASE%.*} $DISTRIB_ARCH)
    EOF
    for feed in passwall_luci passwall_packages passwall2; do
      echo "src/gz $feed https://master.dl.sourceforge.net/project/openwrt-passwall-build/releases/packages-$release/$arch/$feed" >> /etc/opkg/customfeeds.conf
    done
    
    opkg update
    #Then update the package in web for luci-pa..

    Reference link.

  • TDM客户端模式Replication mode(TNC/TCR)详解和如何触发客户端自动更新

    在运行安装TDM客户端时,可以选择TNC/TCR模式

    这个模式下,客户端所需的大部分固定资源文件(Exe程序,配置等)都想自动下载同步到本地,从而优化TDM系统启动速度。当服务器上的程序文件更新时,客户端也会自动下载更新的程序文件。

    所有这些都取决于启动配置文件tmsStart_x64.ini。其中以下配置决定是哪些文件的更新会出发这个自动下载更新动作:

    ...
    // General settings
    //
    // Replication mode:  0 = No replacition
    //                    1 = Sync always when local file timestamp is older
    //                    2 = Start sync only when local update.txt is older
    //
    //
    // Replication code:  0 = No replication
    //                    1 = Sync without directories
    //                    2 = Sync with directories
    // 
    //                    122221...
    //                         +- System
    //                        +-- Form Templates
    //                       +--- Scripts
    //                      +---- Images
    //                     +----- Messages
    //                    +------ Application
    //----------------------------------------------------------------------------
    Replicationmode                    : TMS_REPLICATIONMODE=2
    // Replicationcode                    : TMS_REPLICATIONCODE=11200220
    Replicationcode                    : TMS_REPLICATIONCODE=11222200

    其中的…MODE=2,代表了当本地的update.txt比服务器版本旧时(即服务器有更新的update.txt文件)将触发客户端更新并自动下载更新文件。

    之前一直尝试更新服务器的<TMS_HOME>\SYS\update.txt,但是始终无法触发客户端程序更新。通过观察发现,客户端的SYS\文件夹内容结构和服务器的<TMS_HOME>\SYS文件夹结构是不一样的。

    1. 服务器<TMS_HOME>\SYS\SYS2025…..\文件夹为实际运行的EXE所在位置,将自动下载到客户端的SYS\文件夹下
    2. 不论服务器端的tmsStart_x64.ini是如何配置的(是否使用了UNC,例如\\TMS_HOME\XXX这样的结构)都不影响新安装的TNC/TRC客户端启动。客户端安装程序会重新生成新的适配的tmsStart_x64.ini
    3. 服务器端有多个update.txt文件
      • <TMS_HOME>\SYS\update.txt — 之前一直尝试更新这个文件来触发客户端更新
      • <TMS_HOME>\SYS\SYS2025…..\update.txt — 这个文件更新可以触发客户端更新
      • <TMS_HOME>\SYS\SYS2025…..\x64\update.txt — 这个文件更新也无法触发客户端更新
  • odoo 系统操作备忘录

    修改默认web端口

    # C:\odoo13\server\odoo.conf
    ...
    http_port = 28069 # 默认为8069
    ...
    
  • 数字化市场推广工具-SMTP Relay(邮件群发,邮件转发服务工具)

    最近使用的Sendgrid服务突然不好用了(免费期已过),又搜索了一圈类似的工具,记录在这里

    参考链接:

    7 The Best SMTP Relay Services

    价格敏感的话,直接看我收集的各个Saas服务的Price页面

    Postmark

    turboSMTP

    mailgun

    mailchimp

    SMTP2GO

    mailtrap

    目前暂时在试用sendpulse

    后继还会继续研究如何Web crawlers获客进行Email Campaigns

  • GDI对象导致的TDM系统界面死机的解决方法

    TDM Classix 打开较大模块功能,例如T3D阶梯钻生成器时,会出现界面无响应,内存不够甚至闪退。

    经过排查可能是由于GDI对象瞬时打开过多(系统默认最大10000个),导致系统自动将进程终止。

    暂时的解决方法为调整系统参数(最大10000),以下为操作步骤:

    1. win+R > 运行 regedit — 注册表编辑器
    2. 找到Computer\HKEY_LOCAL_MACHINE\SOFTWARE\Microsoft\Windows NT\CurrentVersion\Windows
      • 调整 GDIProcessHandleQuota = 32768 (十进制)
      • 调整 USERProcessHandleQuota = 32768 (十进制)
    3. 重启计算机

    以上调整可大概率避免瞬时GDI对象超过系统阈值而导致的TDM系统界面崩溃。

    参考链接

  • Add Swap File to low Memory Linux Server

    当在某些底内存主机执行命令时会触发进程被Killed的情况。主要根源是主机内存较小(<=1G,且默认主机安装没有创建swap分区),执行大内存任务会出现这种情况。可以通过增加内存Swap文件的方式来解决:

    1. 检查系统是否已有swap空间
    2. 创建swap文件
    3. 启用swap文件
    4. 开机自动加载swap文件

    以下是所有操作命令

    #检查
    swapon -s
    
    #创建
    fallocate -l 2G /swapfile #创建
    chmod 600 /swapfile
    mkswap /swapfile
    
    #启用
    swapon /swapfile 
    
    #开机自动加载
    vi /etc/fstab
    #添加以下行
    /swapfile   none    swap    sw    0   0

    参考链接